Feeling Crafty
Simple DIY Ideas To Welcome Spring Into Your Home
Spring is finally here. This means it’s time to tackle the spring cleaning. It’s time to take on projects around the house that will help freshen it up a bit after the long, dark winter. And in my house, it’s time to conquer new crafts that will brighten it and welcome the new season. If you’re a creative crafter but are finding yourself in need of a little spring DIY inspiration, I’ve got you covered.
The versatile terra cotta pot shouts spring. With farmhouse-style being all the rage these days, the following simple DIY transformation of an ordinary earthenware container – while certainly beautiful in its natural state – into a stunning, cream-colored flowerpot will add just the right touch of farmhouse feel to any space in your home.
To start, visit your favorite home improvement, craft, or dollar store and grab a few pots, choosing a variety of sizes. You will also need white or cream acrylic craft paint and twine (of course, if you prefer brighter, more vibrant paint colors for your pots, go for it – after all, it’s your project). If you’re interested in adding text to your pot (for instance, if you want to identify the type of plant, succulent, or herb potted in the container), grab a set of alphabet stamps and a black stamp pad. Be sure to choose the small size that has upper- and lower-case letters, numbers, and symbols. You will be amazed how much such this simple step will add to the finished project.
Once you’ve gathered all your supplies, paint the terra cotta pot and matching saucer, applying two or three coats for best coverage, and allow the paint to completely dry between coats. If you desire a more distressed, weathered look, lightly sand with extra fine sandpaper. While the paint is drying, choose a phrase or word you would like to stamp onto the pot. For instance, if you like to grow herbs, design containers for your favorites, such as oregano, basil, rosemary, etc. Not only will you have fresh, beautiful green goodness, but you also have a lovely, decorative pot that identifies what you are growing. Or display spring’s beautiful blooms in pots featuring simple words like “bloom,” “grow,” or “love.” There are so many possibilities. I recommend practicing a little on a scrap sheet of paper before you use the stamps on your painted pot. This will help you figure out how to hold the stamp and how much pressure to apply.
Once your surface is completely dry, stamp your chosen phrase or word, letting it dry for a few minutes. For the finishing touch, adhere the twine by applying a small drop of hot glue in the center of the rim at the top of the pot, being sure to do so on the side you have stamped. Stick one end of the twine on the glue and allow it to set. Wrap the twine around three times, then add another drop of glue and press the twine down into it. Then clip the jute, tie a small bow with the cord, and glue it on top of the beginning/ending area. Voila! You now have an adorable container in which you can add a living plant, an artificial succulent, or leave as is – again, it’s your project, so it’s your choice!
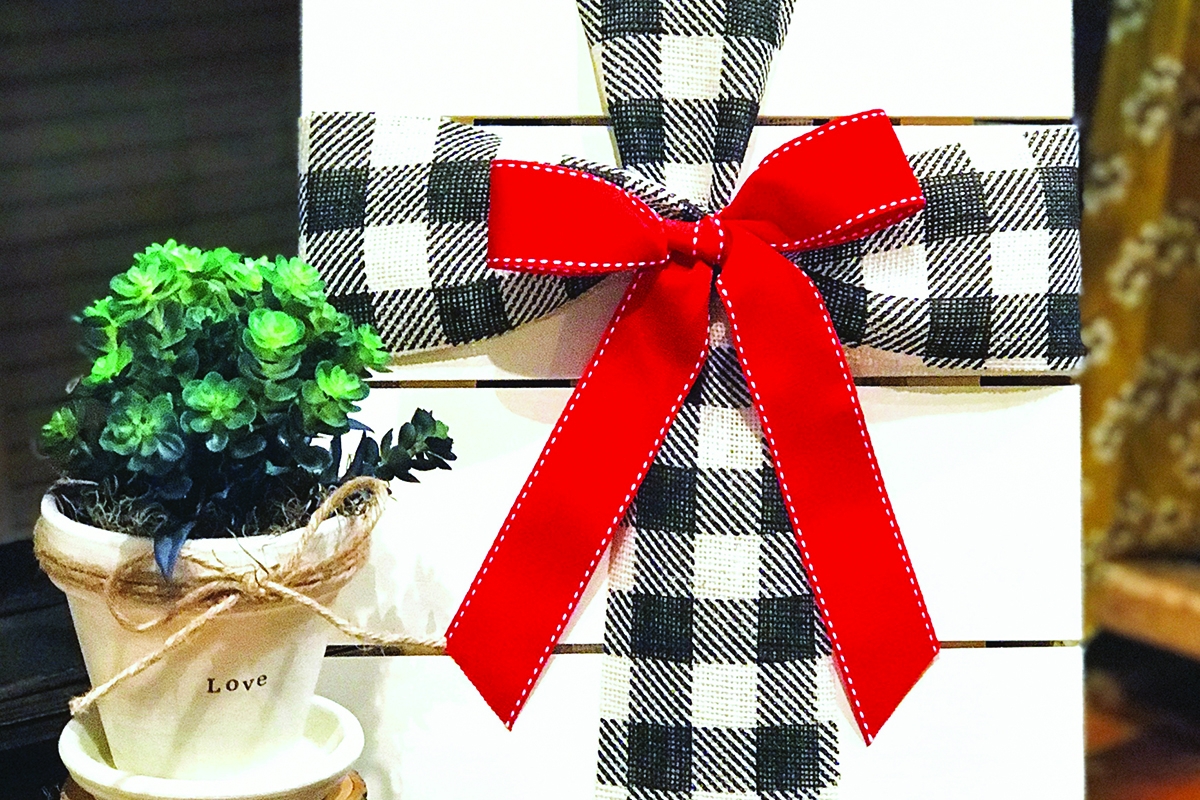
Easter provides another great opportunity for DIYers to dig into their craft closet (or go shopping if their craft closet got a little depleted over the winter months). A fabric cross atop a wooden surface not only helps us celebrate the holiday, but also incorporates the aforementioned love of all things farmhouse. To kick off this craft, grab a piece of wood – eight inches by 10 inches, or somewhere in that range, is a good size to use, especially for your first one. Gather your handy hot glue gun, 2.5-inch and 1.5-inch ribbons, and a nice pair of sharp scissors. Stain or paint the surface of the board in the color of your choice and one that complements your ribbon choices. If you choose to stain the wood, be sure to do this in a well-ventilated area because the fumes will be very strong. And just like with the terra cotta pots, should you desire a more vintage, distressed farmhouse look, lightly sand the painted surface once it’s completely dry. Wrap the 2.5-inch ribbon around the board vertically, securing it to the surface on the back of the board with hot glue. About a third of the way down from the top, gather the ribbon and tie it with a piece of thread. Where the attached ribbon is knotted, wrap another piece of the wider ribbon around the board horizontally and secure it with hot glue on the back. Using another piece of thread, tie a knot around the center of the ribbon. These knots will be on top of each other. Using the 1.5-inch ribbon, create a bow and hot glue it to the center of the cross where the wider ribbons have been gathered and tied. You can also use an old brooch, fabric flowers, big buttons, or whatever strikes your fancy in place of the bow. Whatever you choose, make it your own and let your personality shine through.
Spring is finally here. To celebrate this season, I hope you will enjoy crafting these lovely spring creations that will instantly brighten your home.
Dolores Riggins
Co-owner of Southern Suds & Gifts, located at 213 S. White St. in Downtown Wake Forest, featuring over 35 craftsmen and artists.