A Little Holiday DIY
The long, hot summer has come to an end and that means it’s time to start thinking about the upcoming holidays. Fall is here and Halloween, Thanksgiving, and Christmas will soon be upon us. Now is the time to start thinking about some fun, simple, family-oriented projects to make the season that much more special.
When we think of fall, our thoughts naturally turn to pumpkins – and they are the perfect addition to your decorating. Fabric pumpkins are all the rage this season and you can find them everywhere. There are also many quick and easy DIY versions that will get you into the spirit of the season – and save you a few decorating dollars! A favorite of mine is the toilet paper pumpkin. Sounds funny, doesn’t it? Believe me, it’s absolutely adorable – and these are so simple to create that you’ll probably want to make more than one. All you need is a mega roll of toilet paper (of course), an 18-inch square piece of fabric (fat quarters are the perfect size and can be found at craft and fabric stores), green ribbon, a pencil, and a few good sturdy sticks, cut or broken into three or four-inch pieces (send the little ones outside to gather these – after all, what kid doesn’t like to pick up sticks?). Once you’ve gathered all your materials, spread out the fabric, then unroll the toilet paper eight to 10 times and wrap it back around the roll. This will allow the pumpkin to have a rounder shape. Place the roll in the center of the fabric and begin to cover it with the material. Do so by lifting a corner and sticking it in the center of the roll. Then push the fabric down with a pencil, continuing until the roll is covered by the fabric. Push your stick into the center and tie the green ribbon around it. For a little extra security, add a little drop of hot glue to the bottom of the stick. You’re already done! This little DIY decorating adornment is so quick and easy, so fun to do, and so cute and festive.
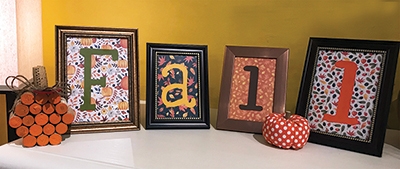
Continuing on with our autumn DIY theme, this next little craft will carry you from the start of fall right on through Thanksgiving – however, you can really make this for any time of the year and for any season or holiday. Local dollar stores are packed with all kinds of goodies for making affordable décor – and that’s exactly where I’ll start with this craft. Begin with conjuring up your favorite seasonal word – “Thankful,” “Gather,” “Blessed,” “Harvest,” and “Fall” are good choices for the autumn season. Once you’ve made your selection, pop into your neighborhood dollar store and pick up the number of frames in various shapes and sizes that equals the number of letters in your chosen word. Stop by your favorite craft store, grab some pretty scrapbook paper in different seasonal patterns, several pieces of cardstock that will coordinate with your paper, and a pack of letter stencils (don’t feel like you need to stick with just one font – mix and match the font styles for added whimsy and personality to your design if you so choose). Once you’ve finished gathering your project items, begin this task by measuring and cutting the scrapbook paper to fit the frames. Trace and cut out the letters in your chosen seasonal word, then glue the letters to the decorative paper. Simply place the pieces in each of the frames for a beautiful, personalized holiday decoration that is perfect for displaying on the mantel, sofa table, etc.
Following quickly on the heels of Thanksgiving comes Christmas. There are so many great ideas for DIY decorating this time of year that it’s hard to choose just one. But somehow, I managed to do so … this last project is a quick, fun, and versatile one that will surely put you in the Christmas spirit – and the best part about it is that you can create it with your own style.
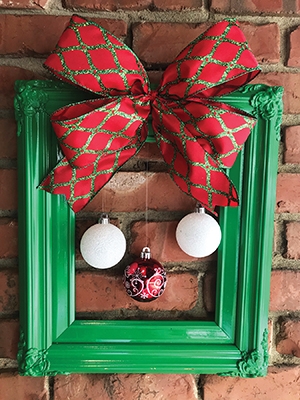
To kick off this DIY design, simply find an old frame. It can be any size, but when choosing the frame, it’s important to keep in mind where you would like to hang it. Breathe new life into that old frame with a fresh coat of spray paint or acrylic or chalk paint. After the paint has dried, let the fun begin – you can make this as simple or as fancy as you want. For a simpler look, tie pretty ribbon of varying lengths to three, four, or five colorful Christmas balls. Flip the frame over and use masking or painter’s tape to mark where the ornaments will go. Double check to make sure you have them where you want them before permanently attaching with hot glue or thumbtacks. Adhere a pre-made bow (or take your DIY talents to the next level and make your own with festive Christmas ribbon) by hot gluing it onto the front of the frame. Within minutes you’ve designed a unique and cheerful craft to complement your Christmas décor.
For a completely different way to transform that ordinary frame into a joyful Christmas decoration, gather inexpensive holiday greenery, pinecones, berries, and ribbon. Then starting in an upper corner, hot glue several pieces of greenery across and down. Add one or two more to each side, covering about a third to half of the frame in both directions. Attach a few pinecones or berries to the greenery. Top it off with a festive bow adhered at the corner and you’ve created a natural, beautiful holiday adornment.
To hang your beautifully upcycled frame on a wall, attach a large picture hanger to the back or use an 8" to 12" ribbon by looping it through the frame opening and tying it at the top, stabilizing with an adhesive or hot glue. Should you choose to use your creation on the front door, the ribbon loops nicely over a wreath hook.
The fall season is a time of crisp and cool weather, nature’s beautiful colors, and all things pumpkin – it’s also the ideal time to tap into your creative juices. And even though your fall calendar is quickly filling up, be sure to set aside some time to craft these clever cuties that are perfect for adding seasonal cheer to your home. Go ahead and fill your mug with some apple cider, settle by the fireplace, and get crafting – ‘tis the season to DIY!
Dolores Riggins
Co-owner of Southern Suds & Gifts, located at 213 S. White St. in Downtown Wake Forest, featuring over 35 craftsmen and artists.